Carpet extractors like the Bissell ProHeat 2X Revolution, HydroWave, or SpotClean Pro are incredible machines for pulling deep-seated grit, pet urine, and stubborn spots out of carpet fibers. However, every time you clean your rug, all that emulsified soil, hair, and sticky carpet shampoo gets pulled directly into the machine's inner chambers, spray nozzles, and recovery tanks. Leaving dirty water or soapy sludge inside your extractor causes lost suction, sour mildew odors, clogged solution sprays, and premature motor failure.
Quick answer: To clean a Bissell carpet cleaner, empty and flush both water tanks immediately after use, remove and rinse the clear front nozzle, clear hair from the brush rolls, and run a tank of warm clean water through the system to flush out internal detergent residue. Always dry all components completely before storing the unit with the tanks detached to prevent mold and seal deterioration.
Why Regular Maintenance Keeps Your Extractor Running Like New
Over two decades of commercial cleaning and residential carpet restoration have taught me one crucial lesson: carpet cleaners fail far more often from poor maintenance than from mechanical wear. When carpet shampoo dries inside tiny spray tips or solenoid valves, it leaves a hardened alkaline film (pH 9–11) that restricts fluid flow. Over time, your machine stops spraying liquid altogether or sprays an uneven pattern that leaves wet streaks across your carpet.
The dirty recovery tank is another massive hotbed for bacterial growth. The dark, damp environment combined with organic carpet dirt creates ideal conditions for mold spores and lingering mildew smells. If you store your Bissell with even an ounce of dirty sludge inside, the next time you turn it on, it will blow foul-smelling air straight into your living room. Proper maintenance after every single job guarantees maximum air-watt suction performance, preserves pump pressure, and doubles the service life of your equipment.
Additionally, hair and rug fibers constantly wrap around the rotating brush roller pins. When hair builds up around the bearing assembly, it increases friction, causing the drive belt to slip, stretch, or snap entirely. Taking ten minutes to maintain your machine after carpet cleaning saves you hours of frustration and expensive replacement parts down the line.
Tools and Supplies You Need for the Job
Cleaning your extractor doesn't require complex mechanical skills or expensive specialty gear. Having the right basic supplies on hand makes the process fast, clean, and completely painless:
- Warm Tap Water: Clean water (below 140°F / 60°C) is essential for rinsing tanks and flushing internal lines.
- Distilled White Vinegar: A mild acidic solution (pH 2.5) that dissolves sticky detergent build-up and neutralizes stale carpet odors without damaging rubber gaskets.
- Microfiber Cleaning Cloths: High-density cloths (at least 300 GSM) to wipe down moisture, detergent splashes, and motor housing dirt.
- Small Detail Brush or Old Toothbrush: Perfect for scrubbing tight corners inside the tank baffle and clear nozzle housing.
- Comb, Scissors, or Hair Removal Tool: Essential for slicing away carpet fibers and pet hair wrapped around the brush roll pins.
- Mild Dish Soap: For washing out heavily soiled recovery tanks and removable floor nozzles.
Cleaner's tip: Never flush carpet extractor lines with boiling water or harsh solvent degreasers like acetone or mineral spirits. High heat warps plastic water tanks and distorts clear nozzles, while solvents melt rubber internal seals and ruin the internal check valves inside the pump assembly.
Step-by-Step Routine Cleaning After Every Use
Routine post-use cleaning should take roughly 10 to 15 minutes. Performing these steps every single time you finish a room prevents sticky build-up from hardening inside the machine.
1. Flush the Internal Clean Water System
Before turning off the machine for the day, empty any remaining concentrated carpet formula from the solution tank. Fill the clean water tank halfway with warm tap water (no detergent). Reattach the tank, turn the machine on over a tile floor, utility sink, or outside lawn, and hold down the spray trigger for 30 to 45 seconds continuous flow. This simple flush clears detergent slurry out of the internal fluid tubes, spray nozzles, and manifold valves so soap residue cannot dry and block the pump.
2. Empty and Scrub the Dirty Recovery Tank
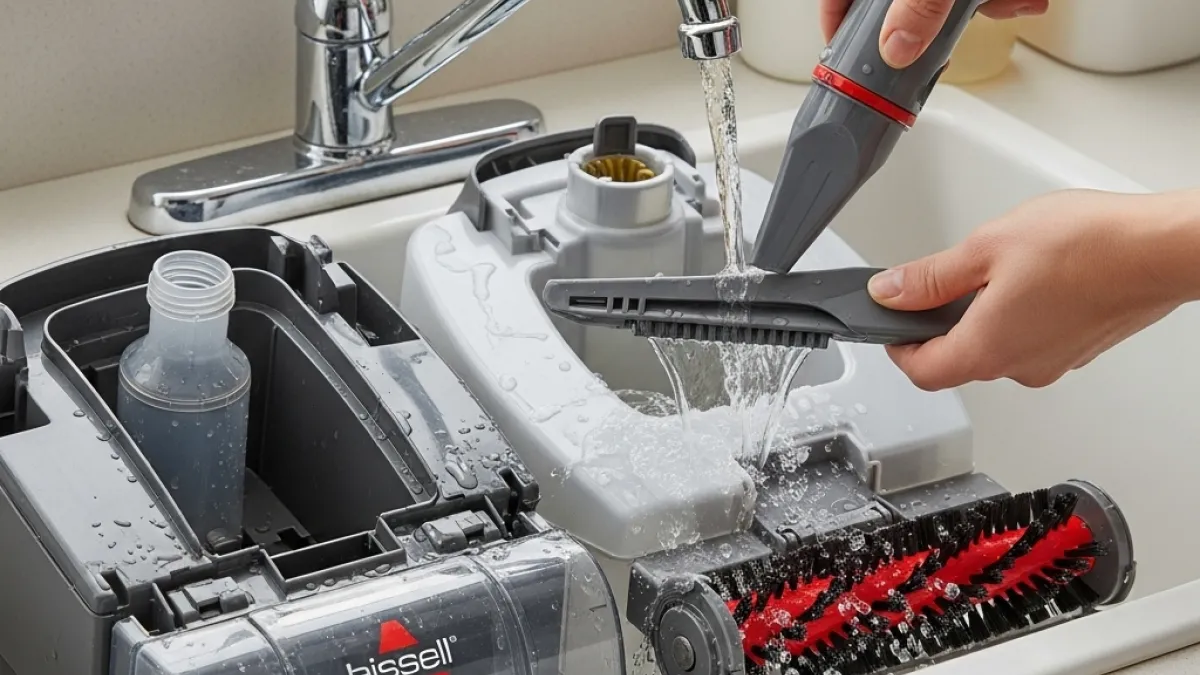
Unlatch the recovery tank, carry it to a sink or drain, and remove the heavy lint screen or rubber stack cap. Dump the filthy fluid out completely. Fill the tank halfway with clean warm tap water, replace the cap, and shake it vigorously to dislodge settling mud and pet hair. Use a soft detail brush to clean around the float stack—this float mechanism prevents water from entering the vacuum motor, so it must stay free of lint and debris. Wipe down the rubber gasket ring with a damp microfiber towel to ensure an airtight suction seal during your next job.
3. Remove and Clean the Clear Front Nozzle
Most Bissell upright models (like the ProHeat 2X Revolution or SmartClean) feature an easily removable front window assembly. Press the release latch or remove the retaining screws, then lift the clear cover off. Rinse the window under running tap water to remove trapped pet hair, sand, and lint. If carpet fibers are stuck deep inside the narrow suction channel, slide a thin flexible wire or pipe cleaner through the opening to pop the debris free.
4. Clear the Brush Roll and Floor Foot
Turn the machine on its side or pull off the detachable brush roll cover (depending on your specific model). Use scissors to carefully cut through hair wrapped around the brush bristles, taking care not to slice the nylon bristles or drive belts. Spin the brush roll manually with your hand; it should rotate freely without grinding. Wipe down the underside of the floor foot housing where wet fuzz and wet mud collect during extraction.
Deep Cleaning & Decalcifying a Heavily Soiled Machine
If your Bissell carpet cleaner has been sitting in a closet with dirty water inside, or if it hasn't received thorough care in months, a standard flush isn't enough. You will need to perform a deep descaling and deep sanitation routine.
To break down heavy soap scum and hard water mineral scale, mix a solution of 1 part distilled white vinegar to 3 parts warm water in the clean tank. Place the carpet cleaner over a drain, turn it on, and spray the entire vinegar mixture through the system. Allow the unit to rest for 15 minutes so the acid can dissolve calcium deposits inside the pump, then follow up by flushing a full tank of plain warm water through the lines.
For persistent sour smells in the recovery tank, fill the dirty tank with warm water and 2 tablespoons of oxygenated bleach powder (like OxiClean) or mild liquid dish soap. Let it soak for 30 minutes, brush down the corners with a narrow bottle brush, rinse thoroughly, and air-dry completely outdoors in direct sunlight. UV rays naturally kill remaining bacterial spores and eliminate lingering odors.
Bissell Model Cleaning & Maintenance Specifications
Different Bissell designs have unique points of maintenance. The table below details recommended care intervals, water temperature limits, and cleaning solutions across popular model categories:
| Model Type | Examples | Max Temp | Flush Interval | Key Maintenance Focus |
|---|---|---|---|---|
| Full-Size Upright | ProHeat 2X Revolution, HydroWave, Premier | 140°F (60°C) | After every use | Brush roll hair removal, clear nozzle cover cleaning, dual-tank seal check. |
| Portable Spot Cleaner | SpotClean Pro, Little Green, Pet Stain Eraser | 120°F (49°C) | After every use | Flex hose flushing, hand tool nozzle debris clearance, suction inlet screen. |
| Commercial / Semi-Pro | Big Green Deep Cleaning Machine | 140°F (60°C) | Every 5-10 hours | Flow indicator cap cleaning, heavy-duty drive belt check, brass quick-connect lubrication. |
Troubleshooting Common Bissell Maintenance Issues
If your carpet washer isn't performing up to spec even after a basic wash, run through these common mechanical checks:
Loss of Suction Power
If the suction drops significantly, first check the recovery tank lid. If the rubber gasket is misaligned, cracked, or missing, air leaks in and breaks the vacuum lock. Next, check the float stack inside the dirty tank—if lint has jammed the floating ball in the upright position, the machine will cut off suction to protect the motor. Clean the float chamber thoroughly. Finally, ensure the clear front floor nozzle is clicked securely into place; a loose front clip will completely kill dirty water uptake.
Machine Will Not Spray Water
A machine that vacuum-sucks fine but refuses to spray usually suffers from air-locked fluid pumps or clogged spray tips. Check the spray nozzles located near the bottom brush foot. Soak the removable spray tips in warm vinegar for 15 minutes and clear the tiny orifice using a fine sewing pin. If the pump is air-locked, gently tap the clean water tank while pressing the spray trigger to release trapped air bubbles inside the check valve.
Storing Your Extractor to Avoid Mold and Seal Damage
How you store your carpet cleaner is just as important as how you wash it. Never snap wet water tanks back onto the machine body and lock them tight. Storing wet components seals in lingering moisture, leading to mildew, bad odors, and rot in internal micro-switches.
After cleaning all parts, leave the clean tank, dirty tank, and removable nozzle out on a towel for at least 24 hours until 100% bone dry. Store the flexible hose on portable spot cleaners in an uncoiled or loosely wrapped position so the corrugated plastic hose doesn't stress or crack at the connector cuffs. Keep the unit indoors in a climate-controlled space between 50°F and 80°F (10°C to 27°C); storing carpet extractors in unheated garages or sheds over winter will freeze residual water inside the pump housing, cracking internal plastic fittings beyond repair.
Professional Cleaner's Recommendation
For most homeowners maintaining standard residential carpets, establishing a strict 3-step post-cleaning ritual—flushing the clean lines with plain water, rinsing the dirty tank, and clipping hair off the brush roll—is all it takes to keep a Bissell unit working flawlessly for 7 to 10 years. If you frequently handle pet messes or heavy mud, invest in a dedicated nozzle cleaning tool and perform a deep vinegar line flush every three months to prevent stubborn buildup and loss of spray pressure.
Frequently Asked Questions
Can I clean my Bissell dirty water tank with bleach?
No, you should avoid chlorine bleach. Bleach can degrade rubber tank seals, corrode internal metal springs, and leave harsh chemical fumes inside the recovery system. Use warm water with mild dish soap or a diluted vinegar solution instead.
Why does my Bissell carpet cleaner smell like sour milk?
A sour odor indicates that wet carpet fibers, dirty water, or pet dander remained trapped inside the recovery tank, float stack, or brush chamber during storage. Wash all removable parts thoroughly with warm water and vinegar, and let them dry completely in bright sunlight before reassembling.
How do I unclog the spray nozzles on my carpet cleaner?
Remove the spray tips or floor nozzle assembly, soak them in warm distilled white vinegar for 15-20 minutes, and use a fine pin or needle to carefully poke out mineral scale or dried detergent blocking the tiny spray tip opening.
Can I put the plastic tanks in the dishwasher?
No, never put Bissell water tanks, nozzles, or plastic parts in a dishwasher. Dishwasher heating elements exceed safe plastic tolerances and will melt, warp, or permanently distort the components, destroying their airtight seals.